Table of Contents
Manual Camera Configuration
Your TetherBox automatically configures most Cameras for optimal performance - see Automatic Configuration for details. This page covers manual configuration for when you've disabled automatic defaults or your camera doesn't support remote configuration.
Tip: Only configure cameras manually if automatic configuration isn't working or you need custom settings. Enable Disable Defaults in camera advanced settings before making manual changes, otherwise your settings may be overwritten.
When to Use Manual Configuration
Manual configuration is needed when:
- Automatic configuration unavailable - Camera doesn't support ONVIF or native API
- Custom settings required - Higher bitrates for high-motion scenes or critical evidence cameras
- Disable Defaults enabled - You've opted out of automatic configuration for this camera
Tip: Most cameras work perfectly with automatic configuration. Check Automatic Configuration first before configuring manually.
Network Settings
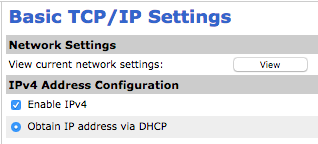
DHCP (Recommended)
Set your camera to obtain an IP address automatically via DHCP. This is the simplest approach and avoids IP conflicts.
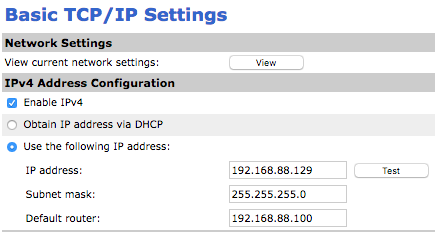
Static IP
If DHCP isn't available, configure a static IP:
- IP Address: Unused address on
192.168.88.xnetwork - Gateway/DNS:
192.168.88.100(your TetherBox)
Warning: Avoid 192.168.88.100 - this is reserved for your TetherBox. Multiple cameras sharing the same IP will cause connection failures.
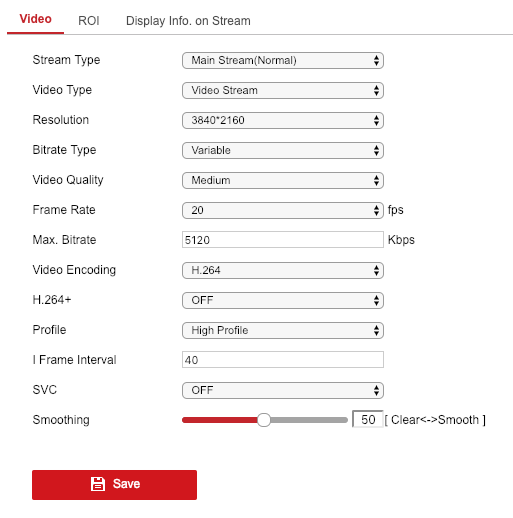
Recording Stream (Primary)
The recording stream is stored for playback and cloud backup. Use H.264 for maximum compatibility.
| Resolution | Recommended Settings |
|---|---|
| 4K | H.264, max fps, VBR, 4096kbps, GOP: same as fps |
| 1080p | H.264, max fps, VBR, 2048kbps, GOP: same as fps |
| 720p | H.264, max fps, VBR, 1024kbps, GOP: same as fps |
Set the framerate to the maximum your camera supports at the chosen resolution (typically 25 fps at 1080p, 20 fps at 4K). Set the GOP (keyframe interval) to match the framerate for one keyframe per second.
- Codec: H.264 (see H.264 vs H.265 for H.265 considerations)
- Profile: High
- Bitrate Type: Variable (VBR) - adapts to scene complexity
- Watermark: Disabled
Tip: VBR (Variable Bit Rate) uses fewer bits for static backgrounds and more for moving subjects - actual average bitrates are often much lower than peak settings.
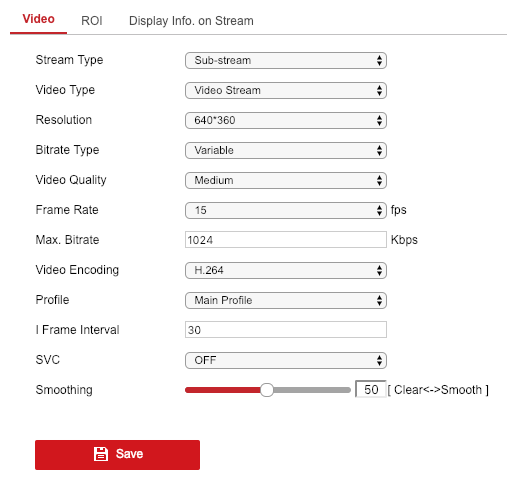
Analytics Stream (Secondary)
The analytics stream is decoded locally for motion detection. Lower resolution reduces TetherBox CPU load.
| Setting | Value |
|---|---|
| Codec | H.264 |
| Resolution | 720p (or camera's maximum if lower) |
| Framerate | 6 fps |
| Bitrate | 768-1024 kbps |
| Profile | Baseline |
| GOP | 6 frames |
Warning: The defaults above are picked to minimise CPU load while preserving detection accuracy. Analytics decoding is the dominant CPU cost on a TetherBox - changing these settings directly changes how many cameras the unit can handle. The table below shows the relative impact.
CPU impact of analytics choices
| Setting change | Effect on per-camera CPU |
|---|---|
| Resolution ≤480p @ 5 fps | ~1.5-2× more cameras (vs 720p baseline) |
| Resolution ≥1080p @ 5 fps | ~2× CPU per camera (~half the cameras) |
| Framerate >5 fps | Higher CPU - no detection benefit |
| H.264 Main profile | ~1× (similar to Baseline) |
| H.264 High profile | +30-50% CPU per camera |
| H.265 (any profile) | 2-3× CPU per camera |
Recording streams may use H.264 High profile or H.265 freely - only analytics decoding is affected. For overall capacity planning by CPU see CPU Recommendations.
Tip: Dahua cameras have a third stream (Sub Stream 2) which is ideal for 720p analytics without affecting your recording or live view quality.
Image Conditions
These settings improve image quality in varying lighting conditions:
- Anti Flicker: 50Hz (UK/Europe) or 60Hz (US/Americas)
- BLC/WDR: Enable Wide Dynamic Range at medium level
- Exposure: Auto
Tip: Anti-flicker matches your local electrical frequency to prevent banding under artificial lights.
Audio Recording (Optional)
To record audio with your video footage, see Audio Recording for complete setup instructions including:
- Enabling audio on your camera
- Recommended encoding settings
- Disabling audio in TetherX when not required
- Legal considerations
Date and Time
Your TetherBox acts as an NTP server, keeping all camera clocks synchronised. Configure your camera to use it:
- NTP Server:
192.168.88.100(your TetherBox IP) - Timezone: Set to your local timezone
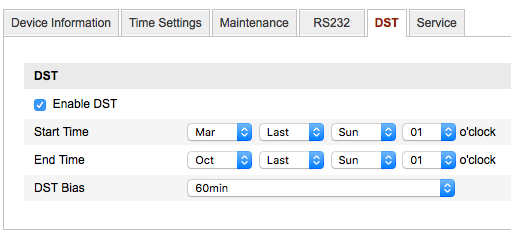
- DST: Configure daylight saving if applicable
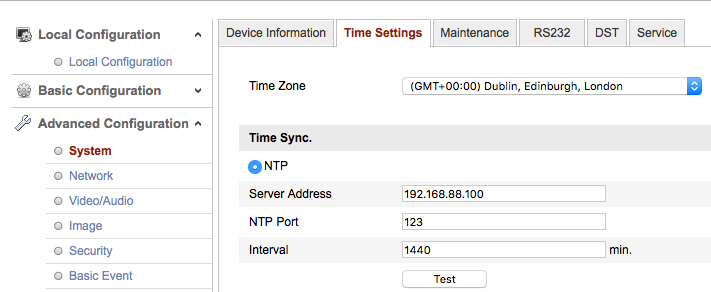
Tip: Accurate timestamps are critical for event investigation and evidence integrity. See TetherBox Time Synchronisation for how TetherX keeps all your cameras in sync automatically.
Vendor-Specific Guides
Some manufacturers require additional configuration steps:
- Dahua Setup - Three-stream configuration for optimal analytics
- Hanwha / Wisenet / Samsung Setup - Profile configuration for cameras, NVRs, and DVRs
- Hikvision Setup - RTSP URLs and remote firmware updates
- Mobotix Setup - ONVIF/RTP integration for classic Mobotix cameras
Related Articles
- Automatic Configuration - Let your TetherBox configure cameras automatically
- ONVIF - Enable ONVIF for automatic configuration support
- Camera Troubleshooting - Diagnose connection and recording issues
- Testing with VLC - Verify stream URLs before adding cameras
Referenced in: